Techniques using a tripod
Using a tripod isn't just plonking a camera and using it, which most people do. Its a versatile tool that you need to master. Just about all DSLR owners have one of these, but they don’t always use it. Tripods come in all shapes sizes and of course prices. Many owners buy a cheap tripod and are disappointed with it and then don’t use it. For video productions, you need a tripod and you need a good sturdy one. Sturdy often means pricey, but you often pay more for a name. I have several different tripods. Some are well known names and same are not. When you come to look at the pictures and video you cannot tell which picture or which video was taken on which tripod.
The basic rules with videos (which of course
can be broken) is that if the subject is moving the camera says still and if
the subject is still the camera moves to add interest. There is nothing worse
than a still person being videoed by a camera that is moving all over the
place. A tripod offers a stable platform. For a still photograph a good ball and socket
mount can be great but for video we need a good pan and tilt head especially a fluid
head which allows smooth pans and tilts. To be practical the head needs a quick
mount attachment so that the camera can be moved and fitted into the next mount.
When would you use it?
There are two basic
types of video shot.
The first is when the
camera is still – this needs a tripod.
The second is when
the camera moves and this can still require a tripod with a good pan and tilt head.
There is probably nothing that is more noticeable than the camera moving around. Sometimes it is right but usually it isn't. The audience then can concentrate on the video rather than the camera movement.
So to answer the question when should a tripod be used, basically the answer is all the time. If you are taking video of yourself then the tripod is ideal since you can compose the image and you have both hands free to do what you want.
Why would you want to use it?
For the small
video production team which can often be only one person then a tripod really is a
must. The hand held selfie is just far to wobbly and is often distracting. If
you are sitting a little way away from the camera then you need a tripod.
Buying a Tripod
What to look for
Tripods range in size from mini tripods that fit in your pocket, travel tripods that are perfect for backpacking and professional studio tripods capable of securely supporting the heaviest professional cameras.
Never buy a bigger tripod than you are willing to carry.
Always buy the sturdiest tripod you are willing to carry.

Think separate head and legs. You can choose which head you put on your tripod. It is more expensive but actually cheaper in that you get what you want rather than wasting money on a head you might not use.
Carbon Fibre is the lightest and strongest material for tripod legs and so is often preferred by outdoor and traveling photographers and videographers. Aluminium tripods are strong and lightweight and while a bit heavier are more affordable than carbon fibre.
Buy the strongest you can afford. If you need a lightweight carry tripod then think big and sturdy but made of carbon fibre.
There is no “one tripod to rule them all”. Most people end up with more than one.
Many tripods are geared for Photographers. Videographers needs are slightly different and usually this means a big heavy tripod that isn't going to go anywhere.
The best head for video is a fluid-effect heads.
If you try one and you will immediately see how much easier they are for getting really smooth pans and camera movements. You can vary the friction so that it’s easier to achieve very slow pans with it damped right down, or backed off for a faster whip pan. A quick release plate on these tripod heads is pretty much a necessity.
Why use a tripod?
The longer the lens, the more chance of shake and for shots with a telephoto lens then a tripod becomes a necessity.
The longer you hold the camera the more unsteady the shot becomes. So use a tripod.
There are loads of tripods on the market, They nearly all do the same thing, however the one thing they need to be is stable. Years ago my Dads idea of a tripod was that it needed to be as small as possible and extend to be big as possible. The result was a very flimsy tripod that couldn't really hold the weight of his camera.
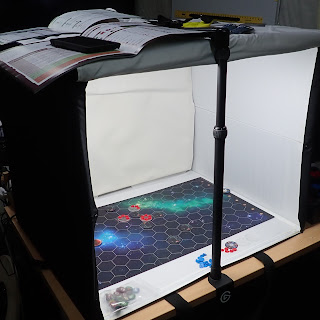
Table top tripod

This is the jack of all trades and can be pushed to do anything. It can be used in video with a good video head

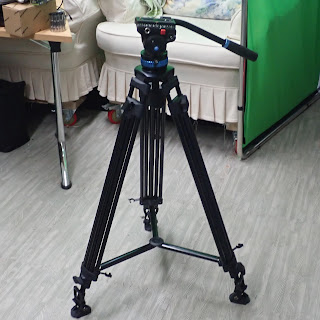
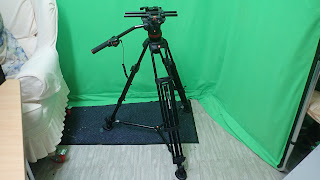
The Video Tripod

I use a Mobile phone, I don't need a tripod.
Going handheld is fine if that's the 'look' your going for, just don't complain when your arms are tired. but if you want to take a video of yourself, they are still a necessity.
10 Tricks and Tips for using a Tripod
- Extend the legs out before putting the tripod onto the ground. This ensures that the legs are the same length.
- Always spread the legs out fully. It makes the tripod more stable and in some cases locks the legs in place.
- Once the tripod is in place then adjust one or two legs to make the tripod level. Using a level if you can.
- The higher the tripod the more unstable it is. The camera often the heaviest part, affects the Centre of Mass of the tripod. The centre of mass needs to be in the centre of the three legs. The lower the centre of mass is the more stable the tripod. So using a heavy bag suspended from the centre of the head often helps.
- Use the centre column sparingly as it decreases the stability of the tripod.
- Arrange the legs if possible so that one leg points towards the talent, or subject.
- However if you are on a downward slope reverse the tripod so that the two legs face down the slope to increase the stability.
- Make sure the tripod you use outside has rubber or foam grips on the legs to stop freezer burn, and use the grippy feet or if on grass the pointy feet
- If using a long lens mount the lens on the tripod the make the system more balanced.
- For nearly all video you need a pan and tilt head. If you can set the drag or friction resistance so that the head will easily move but not too much so that when you stop pushing it it stops too.
Examples


I have several studio tripods made by Manfrotto, and Sirui. These are more expensive and all have pan and tilt fluid effect friction heads.


At the top of the tripod the head is connected to a 75 or 100mm semi circular dish so that the head can be made level without playing with the legs.
Investigating the Pan Tilt and Pedestal actions.
Pan: Have a subject walk across the scene. Keep the centre of the camera the same distance in front of them as they move. This takes time to master, but is one of the greatest skills to learn. Get the subject to walk back. Many people find this is easier to do one way than the other. Keep the video motion smooth.
Pan across a distance scene. You will need to move at a constant speed, but much more slowly than you think to keep all the image in focus all the time and so that the audience don't really notice the effect. You need to pan the camera really very slowly.
Tilt. Start at the bottom of the talent - shoes are good and then slowly move up the the face. You will need to judge the correct distance to be away to create the right effect.
Comments
Post a Comment